Patron Portal accessibility icon ![]() improves text contrast for readability. According to our testing, for best results with JAWS version 2018.1805.33 use with Chrome 66.0.359.181. When using images in the Patron Portal Login Message of the Day and Patron Portal Checkout Center Message, please remember to utilize the Alt text feature.
improves text contrast for readability. According to our testing, for best results with JAWS version 2018.1805.33 use with Chrome 66.0.359.181. When using images in the Patron Portal Login Message of the Day and Patron Portal Checkout Center Message, please remember to utilize the Alt text feature.
Allow Patrons to view, create, edit, and cancel Reservations through the Patron Portal. The Patron Portal provides a dashboard to view latest Checkouts and Reservation, plus the New Reservation screen to reserve Resources in the Patron interface.
How to Log In
Link to the Patron Portal is located in Global Settings. Patrons who have access to the Portal will log in with their WebCheckout Person-ID and password. For those with the Authentication Module, Person-ID and password are managed by the institution, however, the WebCheckout Person-ID must match the institution ID. Without this Module, Person-ID and password must be created in WebCheckout.
Step 1) Enter Person-ID and Password and click Login.
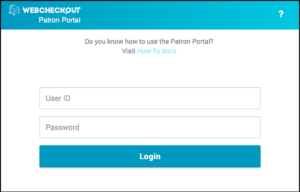
Patron Portal Login Screen
Step 2) Choose Checkout Center
Log into Dashboard with access to a single Checkout Center. With access to multiple Checkout Centers, Choose Checkout Center box appears and Patron must select the Checkout Center.
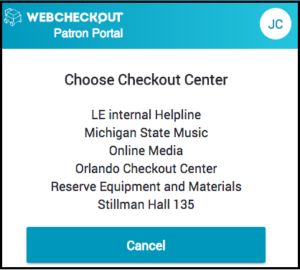
Choose Checkout Center
Once a Checkout Center has been selected, or if Patron has access to only one Center, Patron is logged into their Dashboard.
Patron Dashboard
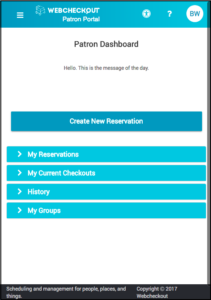
Patron Portal Dashboard
The Patron Dashboard contains information about Patron’s current Checkouts, future Reservations, and completed Checkout. Patron Dashboard also contains options to Create a New Reservation, Report a Problem, Email Calendar link.
Patron Portal Message can be edited from the Checkout Center Patron Portal tab.
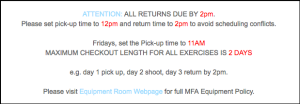
Patron Portal Message
Upcoming Reservations can be viewed by clicking the My Reservations header. Current Checkouts, can be viewed by clicking the My Current Checkouts header. Past allocations can be viewed by clicking the History header. Current Groups and Sections that the Patron belongs to, can be viewed by clicking the My Groups header.
Click on an Allocation to view details; cancel or edit the Reservation; or copy completed Checkout. Current Checkouts can be viewed but not canceled or edited. Reservations that require approval, once approved can only be canceled and not edited. Resources from the completed Checkout can be copied to a new Reservation.
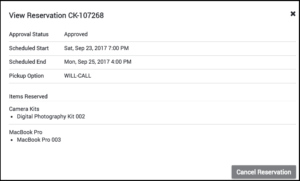
View Allocation
Click the ![]() to view menu options as listed below.
to view menu options as listed below.
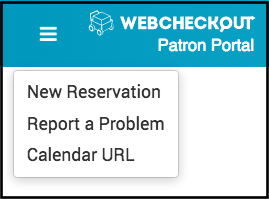
- New Reservation: Directs to the New Reservation screen.
- Report a Problem: Requires Help Desk Module. Patrons may submit Tickets from the Portal.
- Email Calendar: Requires Email Messaging Module. Patron will receive a URL to view their Checkouts and Reservations in iCalendar of choice.
Logout and to change Patron Portal Checkout Centers can be found by clicking the session manager on the top right.
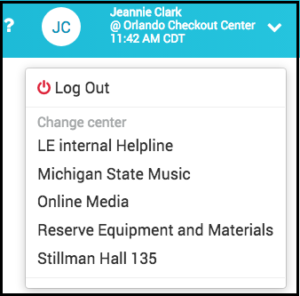
Session Manager
Select ![]() to view a higher contrast version of the Patron Portal.
to view a higher contrast version of the Patron Portal.
Select ![]() to access the help link.
to access the help link.
New Reservation
Patrons can create Reservations and those Reservations will appear in WebCheckout. Several areas of the New Reservation screen are configurable from WebCheckout. Please visit Patron Portal Settings for details.
Create New Reservation
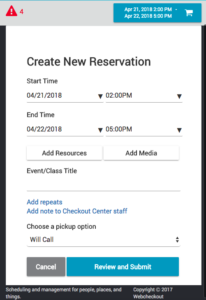
- Click Create New Reservation.
- Set Reservation Start and End Times.
- Include an Event or Class title if option is available. Some Checkout Centers may require an Event or Class title to Submit the Reservation.
- Schedule Repeat Reservations if option is available by clicking Add repeats.
- Include notes to the Checkout Center by clicking Add note to Checkout Center staff.
- Set Pickup Option when multiple are available.
- When Set is selected, Delivery Location must be specified.
- Click Add Resources. Click on the Resource Type to expand subtypes or view Resources.
- To search for Resource, enter Resource or Resource Type name in the Search by Keyword field. Only like matches will appear in the list.
- Resource Types that do not require Authorizations; Patron’s Authorized Resource Types; and Resource Types Visible in the Patron Portal are viewable in the Add Resources screen. When Patron is not Authorized to use Resource Type or Resource Type is not Visible, those Resource Types and their Resources are not included in the Portal.
- Those with the Media Module, select Browse Media to search and select Media Resources.
- To add Resources:
- Without RRT module, click a Resource Type to view Resources. Click Add.
- Resources with Info, click to view applicable resource details: Name, Contained Resources, Description, Condition Notes, and Accessories.
- With RRT module, Patron has the option to reserve individual Resource or Reserve One of This Type.
- Individual Resource: Click Specific Items & Availability.
- Reserve One of This Type: Button will add any Resource of the selected Resource Type.
- Once items are added, the Shopping Cart will reflect the count of items.
- Add multiple Resources by clicking the Shopping Cart and selecting amount. To enter in amount, select 10+ and then type in amount.
- If error icon
 appears on top left, click the icon to view details. Errors must be corrected to save Reservation.
- Patrons must abide by all Policies; cannot have a Hold; cannot have an Overdue Invoice; must have Signature on File when required; and cannot possess Late Resources at any Checkout Center. If these conditions are not met, the Reservation cannot be confirmed.
- To edit the Reservation, click
 .
. - When ready, click Review & Submit.
Once Reservation has been made, the Dashboard will include this Reservation along with any Repeats. WebCheckout will show the Patron as the Operator, indicating the Reservation was made from the Patron Portal.
Edit Reservation
Reservations can only be edited if the Start Time is outside of the Minimum Reservation Lead Time Policy. Additionally, if Patron Portal Reservations require approval, only those that have not yet been approved and outside of the Minimum Reservation Lead Time Policy can be edited.
1. Go to the Dashboard to select Reservation. When in the New Reservation screen, click Cancel or X on the top right to go back to the Dashboard.
2. Click on the Reservation to prompt the View Reservation window.
3. Select Edit Reservation to open the Reservation screen (similar to the New Reservation screen but with the current Reservation information). When Patron Portal Reservations Require Approval, Reservations with Pending Approval status can be canceled or edited. Reservations that have an Approved status can only be canceled and not edited in the Patron Portal.
View Allocation
4. Make changes to the Reservation including:
- Change Start and/or End Times.
- Add Resources.
- To remove Resource, click the Shopping Cart icon.
5. Click Confirm to save edits. Confirmation will appear.
Cancel Reservation
In the View Reservation window, select Cancel Reservation. Select Yes to confirm cancellation.
Confirmation of canceled Reservation will appear.
Copy Completed Checkout
Copying completed Checkouts will add the original Resources to a new Reservation. To copy a completed Checkout:
- Select the Allocation from the Completed Checkouts section to open the View Checkout window.
- Click Copy Checkout.
- Select the Pickup and Return Times and make necessary edits.
- Click Confirm to save new Reservation.
Report a Problem
Located in the menu ![]() , Report a Problem allows Patrons to submit Help Desk Tickets. Requires the Help Desk Module and the Checkout Center must enable this feature. Ticket Summary and Description are required fields. Patron is the Reporting Patron in WebCheckout.
, Report a Problem allows Patrons to submit Help Desk Tickets. Requires the Help Desk Module and the Checkout Center must enable this feature. Ticket Summary and Description are required fields. Patron is the Reporting Patron in WebCheckout.
Email Calendar
Located in the menu ![]() , Email Calendar provides Patrons their unique ICS Feed URL to view their Checkouts and future Reservations in an iCalendar. Copy the Calendar URL and add to their iCalendar of choice. Requires the Messaging Module.
, Email Calendar provides Patrons their unique ICS Feed URL to view their Checkouts and future Reservations in an iCalendar. Copy the Calendar URL and add to their iCalendar of choice. Requires the Messaging Module.