Facilities Application
The Facilities App is dedicated to key management, and provides a secure method to store sensitive key information and track key usage history. This application requires a specific Facilities Checkout Center, and Operators must have the Manage Keys and Manage Locations capability to use the Facilities App. To access the Facilities App from WebCheckout, click on the Applications icon ![]() then select Facilities.
then select Facilities.
Please contact support@webcheckout.net to inquire about adding the Facilities App and the Key Checkout Center. The Facilities App beta version was released in July 2021. To create data via import and specifications, see Facilities Import.
Facilities Navigation and Definitions
Facilities pages can be accessed through the list options on the home screen or by clicking the navigation icons.
| Home Screen | |
| Hooks | |
| Keys | |
| People | |
| Locations | |
| Outgoing Keys | |
| Incoming Keys |
Locations
In the Facilities App, a Location represents any physical space door that has a lock and requires management of access through that lock. Facilities Locations are different from circulating resources of Metaclass “Location” in WebCheckout.
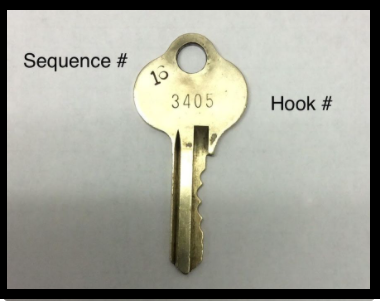
Key Hook (Hook)
Key Hooks (or Hook for short) is a record that represents the collection of keys that are all cut the same way and associated with locations or equipment locks they will unlock. Similar to a Resource Type, or category of items, in WebCheckout.

Keys
On each Hook sit the individual Keys, which are a single, serialized resource capable of unlocking a location or a lock to a piece of equipment.
Keycut
Seen from the horizontal profile of a key. Defined by the peaks and valleys cut into a blank key that activate a lock’s tumblers.
Keyway
Seen from the vertical profile of a key. Typically unique per lock manufacturer. For example, a ‘Baldwin’ key won’t fit a ‘Kwikset’ lock.
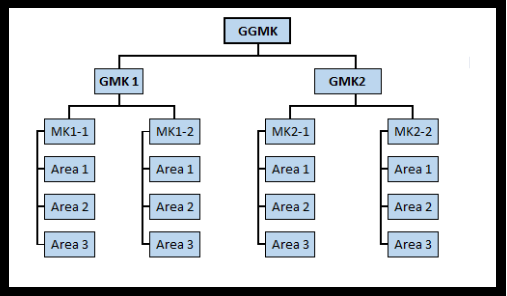
Key Hierarchy
Keys allow for an infinite hierarchy of related keys. Below are key terms and how they relate within the key hierarchy:
| Change Key | A single-use key, such as the key that unlocks a specific room. As distinct from a Master Key. |
| (Grand) Master Key | A key that opens multiple locks and performs the function of multiple subsidiary keys. Keys that open locks managed by a collection of Master keys are called Grand Masters. Grand Grand Masters (GG Masters) function as a collection of Grand Masters, etc. There is theoretically no limit to the number of levels of hierarchy. |
| Child Key, Parent Key | The relationship between different keys in a hierarchy. The parent key is a key that is one step above its child key. For example, a Master Key is a Change Key’s parent, and a Change Key is the Master Key’s child. |
Getting Started
1. Importing a Key Center
The Facilities App requires a dedicated Checkout Center, also known as a Key Center. The Key Center manages the circulation and assignment of Keys, Hooks, and Locations. A Key Center can only be created through import. Please contact support@webcheckout.net to inquire about adding a Key Checkout Center.
A Key Center must be created first to add keys. Additionally, only one Key Center per Organization is allowed.
As of our August 2022 Release, the pages in Facilities contain search terms and result columns, to adjust the report, similar to the other Find Screens in WebCheckout. Additionally, ![]() will download the find page as a spreadsheet.
will download the find page as a spreadsheet.

2. Create and Edit Locations
To create and edit locations, click on the ![]() menu bar the Facilities home screen, then to create a new Location select the
menu bar the Facilities home screen, then to create a new Location select the ![]() icon. Fill out the New Location sheet with the following required and and optional information will create a New Location record.
icon. Fill out the New Location sheet with the following required and and optional information will create a New Location record.

| Data Field | Data Definition |
| Name | Required. Location Name |
| Short Name | Short Name Abbreviation, such as BD or LD 234 |
| Location Code | Required. Unique ID of the Location Property |
| Parent Location | Broader Location record this Location sits in. Such as a building that houses a specific room. |
| Location Type | Required. List of location types to define this physical space. |
| Street 1, Street 2, City, State/Province, Postal Code, Phone Number | Physical Address information of the Location. |
| Lock Type | List of lock types to define what this key opens. |
| Coordinates | Latitude and Longitudinal coordinates of this physical Location. |
| Notes | Additional note field describing this Location for Operators. |
Location Find Screen
Once a Location is created it will be added to the Location’s Find Screen. This page gives the ability to search for Locations and Sub Locations.

Location Find Screen Search Terms:
| Data Field | Definition |
| Short Name | Abbreviated location Name. |
| Location Code | Unique Identifier for Location. |
| Location Path | Order of Location Hierarchy |
| Count | Number of Sub Locations under a Location |
Location Detail Screen
By clicking on a Location in the find screen, it will open the Location Detail Screen. This displays the Location information entered during Location creation and can be edited by changing the property information.

- New Sub-Location: Creates a new Sub-Location under the Parent Location.
- Add Assignment Hook: Assigns an existing Hook to this Location.
- Add Assigned Person: Assigns a Patron to this Location.
- Destroy Location: Remove the location record.
3. Create and Edit Hooks
Key Hooks are a category of Resource Types that represent a collection of keys which are all cut the same way. It associates specific keys with the locations or equipment they will unlock. On the facilities home screen, click on ![]() to enter the hook page, where you can search by hook number or by location in the key search.
to enter the hook page, where you can search by hook number or by location in the key search.
To create a New Equipment Hook or new Location hook, select the option to create.
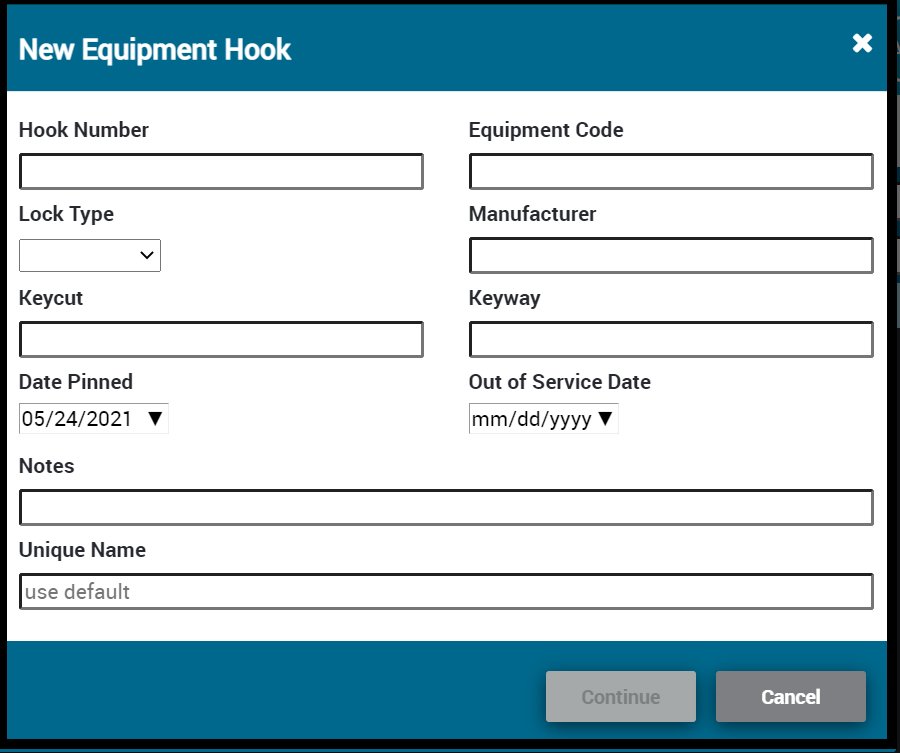
Then enter related information about this new hook. See the definitions for each field in the table below. Please note, keyway and keycut information can be used to replicate the key, which will make this information more sensitive than the rest. Information that’s not required to track and assign key resources should not be visible without the Manage Keys capability.
| Data Filed | Hook Type | Definition |
| Hook Number | Location/Equipment | Unique Number associated with this type of key that are all cut the same way. |
| Master | Location | Indicates this location hook has a Master Hook above it. |
| Equipment Code | Equipment | ID of the Equipment it relates to. |
| Lock Type | Equipment | Determines the type of lock this key type will open. |
| Manufacturer | Location/Equipment | Informational record of who created the key. |
| Keycut | Location/Equipment | Seen from the horizontal profile of a key. Defined by the peaks and valleys cut into a blank key that activate a lock’s tumblers. |
| Keyway | Location/Equipment | Seen from the vertical profile of a key. Typically unique per lock manufacturer. For example, a ‘Baldwin’ key won’t fit a ‘Kwikset’ lock. |
| Date Pinned | Location/Equipment | Lists date of key creation. |
| Out of Service Date | Location/Equipment | Available date for keys no longer in service. |
| Notes | Location/Equipment | Available field to provide notes for this Hook Number. |
| Unique Name | Location/Equipment | Unique ID of the Hook. |
Hook Detail Screen
When on the Hook Detail Screen, select a menu item ![]() update Hook information.
update Hook information.

- Rekey Hook: Changes the Keycut of the Hook and moves all the Keys on the Hook to a Status of obsolete.
- Take Out of Service: Removes the Hook and its Key data from Service but retains the Record of the Hook.
- Add Key: Populates a new Key modal to edit key information such as keycut and keyway.
- Add Location: Ties the Hook to a New Location.
- Destroy Hook: Allows removal of Hook record when no keys sit under the Hook.
Edit Keycut and Keyway
When editing Hook information, Keycut and Keyway can be edited by scrolling down to Keying History and hitting the pencil icon. This opens the Revise Keying History modal that lists the keys impacted by this change:
4. Create and Edit Keys
Selecting Add Key on the Hook Detail Screen brings up the
 New Key modal where Sequence ID and Unique Name information on the key can be entered. After the key is created, it will be added to the Hook detail screen.
Key Find Screen
The Keys’ page populates a find screen with available search terms and result columns to update a result set.

Key Detail Screen
Clicking on a key number will pull up the key detail screen, which lists its unique information and the locations it opens. Please note, keyway and keycut information can be used to replicate the key, which will make this information more sensitive than the rest.
Edit Keying allows updating keying history for when the hook was last keyed. These options are constrained by the keying history of the Hook.
Key Circulation
Key circulation is the process of associating assets and their custodians, and provides more flexibility than standard WebCheckout circulation. There are two primary types of key circulation:
1. Checkout/Reservation Types: Keys that must be picked up and returned on a specific date. Keys are circulating.
Example: Students picking up dorm keys and returning them at the end of the year. These keys are circulating.
2. Assignment Type: Keys designated to a Patron for an extended period of time, where there may or may not be an expected return date. No agreement form or email reminders are sent for assignments and keys must be non-circulating.
Example: Staff and Faculty who have their keys as long as they are employed. Because values like “expected return time” are optional. This flexibility gives the ability to project usage beyond the current loan.
Outgoing Keys
To circulate keys, navigate to the Outgoing Keys icon ![]() , and type the Patron’s name into the Person bar. Then, fill out the outgoing keys specifics.
, and type the Patron’s name into the Person bar. Then, fill out the outgoing keys specifics.
- Person: Name of Patron receiving keys.
- Type: Denotes state of circulation type.
- Reservation: a circulating key ready for pickup immediately or for a future date.
- Checkout: a circulating key has been picked up.
- Assignment: a non-circulating key will be assigned to the Patron. Patron has yet to physically receive their key.
- Pickup: a non-circulating key has been given to the Patron.
- Return: Date of expected return. Please note, with Assignment/Pickup this is an expected date.
- Hook: Unique ID of the Key Hook.
- Seq: Unique ID of the Key Sequence.
Please note, due to security, the system will not auto-populate values as they must be fully entered. Once the key has been delivered, it can be returned from this Outgoing pane.

Checking Key Assignment
To search for who presently has keys can be done through the People Icon ![]() . On the People search screen can search by the status Pending Hook Reservations, Has Keys, Has Locations, and All.
. On the People search screen can search by the status Pending Hook Reservations, Has Keys, Has Locations, and All.
Additionally, in WebCheckout, key assignment can be seen by navigating to the Patron Detail screen, under the ![]() tab.
tab.

Incoming Keys
To search for incoming keys and return them, select the Return Icon ![]() . From here, type in the Hook and Key Sequence, then select Return.
. From here, type in the Hook and Key Sequence, then select Return.

People
By selecting the people icon, operators can search for Patrons by typing in their name or selecting their status. Patrons name will autocomplete after three characters. Patrons who are ACTIVE, INACTIVE, and DELETED will populate, as Patrons are not required to have ACTIVE WebCheckout accounts to checkout keys.
Pending Reservations
To display Patrons who are awaiting keys, Operators can load the LOCATION-ASSIGNMENT-IMPORT file to assign Patrons to Facilities Locations, granting them permission to those location hooks.
For specifications on the LOCATION-ASSIGNMENT-IMPORT and downloadable templates see Facilities Import. The number of Patrons awaiting keys will display in yellow beside the People tab. Clicking on the People tab will navigate to the People Find Screen and show those Patrons who have Pending Hook Reservations. Select the Patron you want to assign which will open their Patron Assignment screen. 
Enter the Sequence ID of the key you are assigning and hit Assign. Key will now display under the Patron Detail screen in Facilities and in WebCheckout. By hitting the forward and back ![]() icons, Operators can scroll between Patrons with Pending Hook Reservations to quickly assign key sequences.
icons, Operators can scroll between Patrons with Pending Hook Reservations to quickly assign key sequences.
Manual creation of Pending Hook Reservations is created in the Location detail screen by selecting Add Assigned Person. Then, selecting Add Assignment Hook links any assigned person to available keys on that hook. 
After Pending Hook Reservations have been manually created, running the Manage hook and key circulation for location assignments process in the Processes tab of the Global Detail Screen will generate Pending Hook Reservations on the Facilities’ front screen.
Rekeying
Hooks may need to be rekeyed due to loss of keys, repair, or for security reasons. To rekey, navigate to the hook detail screen and select Rekey Hook.
From the Rekey Hook modal, enter the new keycut and the Out of Service Date for the old keycut. Once the Out of Service Date has passed, keys with the old keycut will be listed as obsolete. 
This historical information of previous keys can be imported through the KEYING-IMPORT. For details on this import, see the Facilities Import.
Please note, obsolete keys assigned or checked out will still need to be returned to no longer display on a Patron’s resources screen; and to no longer be listed as “Has Keys” on the People find screen of Facilities.
Key Center Policy Best Practices
For best performance of a Key Center, we recommend adjusting your Checkout Center Policies and Settings to the following:
- Set Checkout Center “Turnaround Time” to 0 Minutes.
- Set “Delete Turnaround Time Schedules on Return” to True.
- Set “Pickup Grace Period” appropriately.
- Set “Patron Portal Access Requires Authorization” to True.
- Create Checkout Center and Organization Calendar.
- Set “Default Allocation Times” appropriately (If Organization Calendar is set, End of Term is recommended).
- Set “Max Checkout Length” appropriately.
- Configure “Honored Fines, Holds, and Lates” appropriately.
See Also