Beginning in version 4.5.0 a Resource and its Resource Type must be managed by the same Organization. This means that:
- Resource Types and their subtypes must all belong to the same Organization. And
- Resources can only belong to Checkout Centers managed by the same Organization its Resource Type belongs to. Resources can no longer be assigned to Checkout Centers outside of the Resources Type’s Organization.
Does My Instance Have These Issues?
To confirm if your instance includes any Resource Types or Resources with issues, visit the System Checkup Report, located under the Reports menu, then select Other Reports. System Checkup Report is last on the list.

System Checkup Report
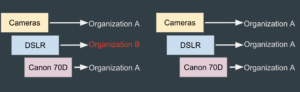
If results appear in the top section RTypes with Parents in Another Org, this indicates that there are Resource Types with subtypes in another Organization. In this example, the parent Resource Type Cameras belongs to the Organization Photo Department, but its subtype DSLR belongs to the Media Organization.
How Can These Issues Be Corrected?
If Resources and Resource Types are not updated prior to upgrading to 4.5.0, WebCheckout will solve the issue itself. Here’s how:
During the 4.5.0 upgrade, WebCheckout will first update any Resource Types with a different Organization than its Parent Resource Type. Those Types will be assigned to the same Organization as its Parent Resource Type so that they belong to the same Organization.

Next, WebCheckout will handle Resources assigned to Resource Types at another Organization. Resources will remain in their assigned Checkout Center, however, WebCheckout will create a new Resource Type that is a duplicate of the original Resource Type, but assigned to the same Organization as the Resource’s Checkout Center. The Resource will be moved to this new Resource Type.
The new, duplicated Resource Type will fall under a common Parent Resource Type called 4.5. Migrated Resource Types. With this update, the original Resource Type nested structure will no longer be available for the Resource. Only the Resource’s parent Type will be duplicated.
To fix these issues manually prior to the upgrade, look at the data in WebCheckout and identify what needs to be corrected. The System Checkup Report will show the issues, and the Preset Reports in the Find Resources and Find Types screen allows to export these issues in an importable file.
First, let’s review how to fix Resource Types with Parent Resource Types in a different Organization.
To fix this issue prior to the upgrade, assign the Types to the same Organization of its Parent Resource Type. This can either be done via the import files to update Resource Type data en masse, or in the Admin Tab of the Resource Type detail screen by updating the Organization.
We recommend addressing the Resource Types first, before updating Resources.
Updating the Resource Type Organization with Import Files
- Generate an exportable report of Resource Types that need to be adjusted.
- Select Resources then Find Types.
- Select 4.5.0 Upgrade Review – Type s in the Search Presets drop down.
- Remove the Organization Search Term by clicking the X to right of this field. This will search though all Organizations and all Resource Types with issues.
- Select Find.
- This report will automatically populate with four columns: Resource Type, RTID, Organization, and RType Org Path.
-
- The Resource Type column is the identifiable Resource Type.
- The RTID column includes the unique ID for that Resource Type.
- The Organization column includes the Organization the Resource Type belongs to.
- The RType Org Path includes the parent Resource Types and the Organizations they belong to.
- Note the Organization that the Resource Type belongs to and the Organization that its Parent Resource Types belong to. You will need to move this Resource Type to the same Organization of its parent Resource Type.
-
- Select Export As, then Export Importable to generate a CSV with all information included in the Resource Type detail.
- Open the CSV and copy and paste the the parent Organization from the Find Resource Types screen into the Organization field on the CSV.
- Update the Organization field for all Resource Types on this CSV, then save the document.
- Import the updated Resource Type file with a blank Resource Import file that only includes the header.
- Once the import is complete, run the System Checkup Report again and ensure there are no issues that appear under RTypes with Parents in Another Org.
- If issues do appear rerun the 4.5.0 Upgrade Review- Types and make the necessary changes.
Updating the Resource Type Organization in WebCheckout
To update the Resource Type Organization manually, simply note the Parent Type Org, then select the Resource Type name from the System Checkup Report. This will load the Resource type detail screen. Select the Admin tab, then updated the Organization.
Let’s review how to fix Resources with Resource Types in a Different Organization
To fix this issue prior to the upgrade, assign the Resource and Resource Type to the same Organization. For this issue there are four different scenarios you may be correcting. We recommend updating the Resources in steps, addressing each issue before moving onto the next. This may require importing multiple times. Let’s review each of these scenarios.
- Resources that were accidentally assigned to the wrong Checkout Center.
- Resources in the correct Checkout Center, but the Resource Type belongs to the wrong Organization.
- Resource Type that includes Resources that belong to different Checkout Checkouts, under different managing Organizations than the Resource Type.
- Resources that were moved to a Graveyard or Decommissioned Checkout Center, but still assigned to their original Resource Type at a different Organization.
Using Import Files
First scenario, Resources assigned to the wrong Checkout Center, can be solved by moving the Resource to the correct Checkout Center. This can be done en masse by updating the Checkout Center column on the Resource Import file.
- To update en masse, begin by exporting an importable CSV of Resources that appear on the System Checkup Report.
- From the Find Resources screen, select the 4.5.0 Upgrade Review Preset and remove the Checkout Center field to search for Resources with issues.
- Select Find, then select Export As, then Export Importable.
- Update the checkout-center column to move Resources into the correct Checkout Center.
- Save the CSV document then import this document along with a Resource Type Import file that includes only the headers.
Second scenario, a Resource that is assigned to the correct Checkout Center, but the Resource Type belongs to the wrong Organization, we recommend moving the entire Resource Type nested structure to the correct Organization. This scenario applies to entire Resource Type structure that only have Resources managed by a single Organization. Be sure that other Resources Types nested in this Resource Type tree are not assigned Resources managed by other Organizations.
To resolve this scenario, move the entire Resource Type structure to the correct Organization. Moving the entire Resource Type structure will ensure that the same nested structure still appears on both the Timeline Scheduler and Patron Portal.
-
- Generate a report of Resources and Resources Types where the Organizations do not match.
- Select Resources, then Find Resources.
- Select 4.5.0 Upgrade Review, then remove the Checkout Center search filter by clicking the ‘X’ next to the filter.
- Select Find.
- This report will be used for informative purposes and may be ran multiple times. If you would like to export all information that appears on this report select Export As, then Export CSV. We will be using the information found in the RType Org Path column to move Resource Type structures.
- Let’s export and update the Organization of a Resource Type structure.
- Select Resources, then Find Types.
- Remove the Organization search filter.
- Select Add Search Term and select Ancestor.
- Copy and paste the first Resource Type that appears in the RType Org Path column into the Ancestor search field.
- Select Find. This will display all Resource Types under that Root Resource Type.
- Select Export As, then Export Importable. This file will include the nested Resource Types.
- Update the organization field to the managing Organization of the Resource.
- Save the updated CSV, then import with a blank Resource Import file that only includes the headers.
Third scenario, Resource Type that includes Resources that belong to different Checkout Centers under different Managing Organizations than the Resource Type, we recommend duplicating the Resource Type tree into each Organization. This will ensure each Checkout Center keeps that same nested Resource Type structures in the Timeline Scheduler and Patron Portal.
To duplicate the Resource Type structure, we recommend using the Resource and Resource Type import files. Resource Type names can be copied but with new, unique RTIDS, and Resources will need to be assigned to these new RTIDs.
-
- Generate a Resource and Resource Type import files for the those Resource and Types with different managing Orgs.
- From the Find Types screen, select 4.5.0 Upgrade Review – Resources, then select Find.
- Select Export As, then Export Importable. This will export the Resource Type import File.
- From the Find Resources screen, select the 4.5.0 Upgrade Review and omit the Checkout Center search filter, then select Find.
- Select Export As, then Export Importable. This will export the Resource import files.
- We will be using both import files and the information on the Find Resource screen to duplicate Resource Type structures.
- Let’s start by duplicating Resource Types on the Resource Type import files.
- To duplicate Types, copy and paste the Resource Type name for the entire nested structure.
- Now, assign a new, unique RTID to these Resource Types.
- Rebuild the nested structures by copying and pasting the RTID of the parent Resource Type into the parent column of the appropriate Resource Type.
- Once Resource Types have been duplicated, save the CSV.
- Open the Resource import file.
- On the Resource Import file, copy and paste the appropriate RTID from the Resource Type file into the RTID column of the Resource.
- Save the CSV.
- Import both the update Resource and Resource Type file.
Fourth scenario, Resources that were moved to a Graveyard or Decommissioned Checkout Center we recommend either:
- Assigning all Graveyard Resources to a common Resource Type, which is at the correct Organization.
- Create a new Resource Type then assign the Resources to that Resource Type by copying and pasting the RTID of that Type into the RTID field in the Resource import file.
- Duplicating or moving the entire Resource Type structure into the Graveyard Organization.
- Similar to scenario three mentioned above. To move or duplicate the entire Resource Type tree to the Graveyard Organization, update the Organization column on the Resource Type file or copy and paste the Resource Type names onto the Resource Type file and assign a new unique RTID to create a new Resource Type of the same name in the new Organization.
- Rebuild the nested structures using the new RTIDs and assign the Graveyard Resources to the new Resource Type by updating RTID column on the Resource Import file.
- Or allowing WebCheckout to fix this issue during the upgrade process.
- The Resource will remain in its Checkout Center and WebCheckout will solve this issue by creating a duplicate of the Resource Type in the same Organization as the Resource Checkout Center. The Resource will be moved to this Resource Type, and the Resource Type will belong to a root Resource Type of 4.5 Migrated Resource Type. This will apply to all Resources assigned to a Resource Type managed by a different Organization.
- Please note, the original Resource Type structure will not be copied. Only the Resource’s parent Resource Type will be duplicated.
See Also