This page describes Groups in versions 4.4x and earlier. For those in version 4.5 and later, please visit Groups for Resource Type and Patron Portal Authorizations.
Authorize Group Members to restricted Resource Types. Only Groups with authorization to the Resource Type can request Resources of that Resource Type without an Operator’s override, and also view and reserve the Resource Type in the Patron Portal. If member is not authorized, the Resource Type is not visible in the Patron Portal, and will require an Operator to make and override the request in WebCheckout.
WebCheckout provides six Group types for classification purposes only. All Group types provide the same functionality of authorizing Members rather than creating individual access to restricted Resource Types. Depending on the Group Type, additional data fields are available. See Admin tab below.
- Group: Student, Faculty, Staff Groups
- Class: Academic courses
- Department: Faculty, Staff, or Students within the institution
- Vendor: Outside provider
- Client: Outside person or company
- Subcontractor: Outside person or company
How to Create a Group and Add Members
Groups and Members can be created in WebCheckout or via the import files.
New Group via WebCheckout
Instructions apply to all Group Types.
- From the Groups menu, select New Group, or the appropriate Group Type. You are now in the Group Admin tab.
- Enter Group Name and any additional fields.
- Description: Group description.
- Origin: Local is default when creating Groups via WebCheckout.
- Expires: Midnight of date, Group no longer has access to Resource Types.
- Organization: Group’s Organization.
- Auto-authorize: Selected indicate Members added to the Group are automatically authorized to use the associated Resource Types. If unselected, Members must be individually authorized to the Group’s Resource Types.
- Type: Group type
- Instructor: Must be a valid Patron in WebCheckout. Only available for Class type.
- Click Save.
- To add Members, select the Members tab.
- In the Add Patron with ID/Barcode field, enter Patron name, ID, or barcode.
- Click Patron name from the selection menu.
- Alternatively, Add Person directs to the Find People screen to search for Patrons.
- Check box next to the Patron. Multiple Patrons per page can be added to the Group.
- Click Add Members.
- Select Patron name from the search drop down menu. Patron is now a Member of the Group.
- To authorize Members to restricted Resource Types, select the Types tab.
- In the Add Type with Name text box, enter complete Resource Type name and click Add.
- Alternatively, click Add to go to the Find Resource Types screen.
- Check box next to the Resource. Multiple Resource Types per page can be added to the Group.
- Click Add Types to Group.
Please see Group Detail Screen below for more information.
New Groups via Import Files
To create multiple Groups and assign Members en masse, use the Group and Group Membership Import files and upload files through the Import Data screen.
Alternatively, with the Integration Module, Group and Member data can update via SFTP. Please visit Group Integration for more information.
Group Detail Screen
View and edit Group information and Members from the Group Detail screen. Find Group, then click on the Group name to open the Group Detail screen.
The left side of the screen includes a summary of data found in the Admin tab, and action links to Delete the Group and Email Expired Members.
Group Detail screen is made up of four tabs.
Members tab
Individually add Members to the Group by entering the Patron name, ID, or barcode in the Add Patron with ID/Barcode field then selecting Patron name from the selection menu.
Add multiple Members by clicking Add Person which directs to the Find People screen. Select Patrons per result page, then click Add Members.
For Members with limited access:
- Membership Expires: Member no longer has access to authorized Resource Types at midnight of expiration date. Email Expired Member link on the left pane of screen will notify Patrons of lapsed membership.
- Manage Auths for this Member: Manage Member’s authorization to the Group’s Resource Types. Members may have varying expiration dates per Resource Type or revoke authorization from selected Resource Types.
Types tab
Group Resource Types
Individually add authorized Resource Types Group by entering the complete Resource Type name in the Add Type with Name field, then click Add.
Add multiple authorized Resource Types, or search for Resource Types by clicking Add Type which directs to the Find Types screen. Select Resource Types per result page, then click Add Types to Group.
See also Resource Type Authorization.
Associated Groups
Associated Groups subsume Resource Types listed in the Group Resource Types section. For example, if Group A is authorized for 10 Resource Types and Group B is authorized for 5 Resource Types, when associated, Group A and B are now authorized for 15 Resource Types. Feature can be helpful when multiple sections have authorization for the same Resource Type.
Enter the Group name and click Associate Group to avoid adding the same Resource Types to multiple Groups.
Associated Groups may be disassociated one-by-one by the selecting the Group, then clicking Remove from Set, or removed from all Associated Groups by clicking Leave this Set. Disassociated Groups will retain currently authorized Resource Types, but will not subsume newly added Resource Types.
Sync tab
(Currently unavailable) Copy Members from one Group to another Group via Synchronization. To un-sync Patrons, Patrons must be manually removed from the Group.
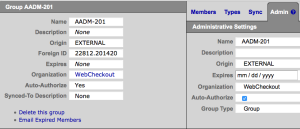
Admin tab
All Group Types include the following fields:
- Description: Group description.
- Origin: Local is default when creating Groups via WebCheckout.
- Expires: Midnight of date, Group no longer has access to Resource Types.
- Organization: Group’s Organization.
- Auto-authorize: Selected indicate Members added to the Group are automatically authorized to use the associated Resource Types. If unselected, Members must be individually authorized to the Group’s Resource Types.
- Type: Group type (Group, Class, Department, Vendor, Client, Subcontractor)
Class Type also includes:
- Instructor: Must be a valid Patron in WebCheckout.
Department, Vendor, Client and Subcontractor Group Types also includes:
- Address 1
- Address 2
- City
- State
- Country
- Zip/Postal Code
- Phone
- Fax
- URL
- Note
Vendor Group Type also includes:
- Account Number
- Maintenance Contract Number
- Maintenance Contract Notes
Client Group Type also includes:
- Job Number
- Agency Number
See Also